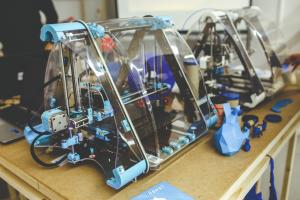
Are you ready to dive into the exciting world of 3D printing? Getting started is easier than you might think! First, you'll need to choose the right 3D printer for your needs. There are many types available, from budget-friendly options for beginners to advanced models for those looking to create professional-quality prints. Take your time to research and find the printer that suits your projects and budget best!
Once you've picked out your printer, it’s time to explore the different materials you can use. The most common filament is PLA, which is great for newbies due to its ease of use and eco-friendliness. If you're feeling adventurous, you can also experiment with materials like ABS, PETG, or even flexible filaments. Each material has unique properties that can shape your final product, so choose wisely based on your project’s requirements.
Next, you’ll need software to create and prepare your 3D models. Many users find success with free programs like Tinkercad or Blender for designing 3D objects, while slicers like Cura or PrusaSlicer help convert your designs into a format your printer can understand. Don’t worry if you’re not a design expert; there are countless pre-made models available online. Websites like Thingiverse and MyMiniFactory offer a treasure trove of designs that you can download and print right away!
After you’ve selected your printer, materials, and models, it’s time to set up your printer. Make sure your printer is calibrated correctly and that the build plate is level. This is crucial for ensuring a successful print. Once everything is in place, load your filament, upload your model, and watch as your ideas come to life layer by layer! Don’t forget to document your process and results - it’s a great way to learn and improve your skills over time.
Understand Different 3D Printing Methods
When diving into the world of 3D printing, it's essential to understand the various methods available. Each technique has its unique strengths and applications, so let's explore a few of the most common ones. Whether you're a hobbyist or a professional, knowing these methods will help you choose the right one for your projects.
Firstly, we have Fused Deposition Modeling (FDM), the most popular 3D printing method, especially among beginners. FDM works by melting plastic filament and extruding it layer by layer to create an object. It's known for its ease of use and affordability, making it an excellent choice for anyone just starting out. Plus, with a wide variety of materials available, from ABS to PLA, the possibilities are endless!
Another method is Stereolithography (SLA), which uses a laser to cure liquid resin into solid form. This technique is favored for its ability to produce highly detailed and smooth surface finishes. While SLA printers can be more expensive and require more maintenance than FDM printers, the level of intricacy that can be achieved is hard to ignore, making it ideal for creating jewelry, miniatures, and prototypes.
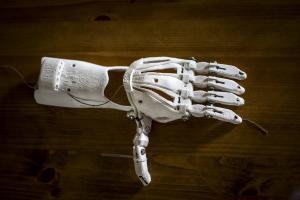
Lastly, there’s Selective Laser Sintering (SLS). This advanced method uses a high-powered laser to fuse powdered materials, such as nylon, into solid structures. SLS doesn't require support structures since the powder surrounding the object can support it during the printing process. This feature opens up a world of design possibilities, especially for complex geometries that might be challenging for other methods.
Choose the Right Materials for Your Project
Choosing the right materials for your 3D printing project is a crucial step that can greatly affect the final outcome. With a variety of filament options available, it’s essential to understand their properties and which will best suit your needs. Common materials like PLA, ABS, and PETG each have unique characteristics that can influence everything from strength to flexibility.
PLA (Polylactic Acid) is a popular choice for beginners because it's easy to print and biodegradable. It works well for projects that don’t require high strength or heat resistance. If you’re looking to create detailed models or prototypes, PLA is a great starting point. On the other hand, if you need something a bit tougher, ABS (Acrylonitrile Butadiene Styrene) may be your go-to material. It is more durable and can withstand higher temperatures, making it suitable for functional parts.
For those seeking a balance between ease of use and durability, PETG (Polyethylene Terephthalate Glycol) is an excellent option. It offers good strength and flexibility along with excellent layer adhesion. This makes PETG ideal for projects that may experience stress or strain. Additionally, its resistance to moisture adds versatility for outdoor applications or containers. Always consider your project’s specific requirements—like strength, flexibility, and temperature resistance—when selecting your materials.
Finally, don’t forget to explore specialty filaments such as TPU (Thermoplastic Polyurethane) for flexible parts or carbon fiber composites for enhanced strength. Each material provides unique properties that can take your project to the next level. So take your time to research and experiment with different materials, and soon you’ll be well on your way to mastering the art of 3D printing!
Troubleshoot Common 3D Printing Issues
3D printing is an exciting journey, but it can come with its share of headaches. If you're facing issues, don’t worry; they’re common and often easy to fix. Let's explore some typical problems you might encounter and how to tackle them effectively.
One of the most frequent issues is warping, especially with larger prints. This usually happens when the material cools unevenly. To combat warping, try using a heated bed and ensure it's properly leveled. You can also apply a thin layer of glue stick or painter's tape on the bed surface to help your print stick better during the initial layers.
Another common headache is the dreaded clog in the nozzle. If you notice that your filament isn’t extruding properly, this might be the culprit. To clear a clog, first, heat the nozzle to the appropriate temperature for the filament you're using. Then, manually push the filament through to dislodge any blockage. If it’s still stuck, running a cleaning filament or performing a “cold pull” can help clear things out.
Layer adhesion issues can also arise, leading to weak prints. This issue often results from printing temperatures that are too low or from incorrect printing speeds. To improve layer adhesion, check the recommended temperature settings for your filament and consider increasing the print temperature slightly. Slowing down your print speed can also give layers more time to bond, resulting in a stronger final product.
Lastly, stringing is another common dilemma, where fine strands of filament are left behind during movement. This happens when the extruder oozes filament while moving between different sections of your print. To minimize stringing, try increasing your retraction settings, which will retract the filament slightly before the nozzle moves to a new spot. Lowering the printing temperature slightly can also help reduce the amount of material that oozes out.